Tampilkan postingan dengan label tips blogger. Tampilkan semua postingan

Minggu, 03 Juni 2012

Navigation Menu With Sub-Menus

Bahasa | English
Today I will explain how to make navigation menu with sub-menu like sample shown below. Try moving your cursor over the menu Blogger Template and see what happen. You will see that the menu expand and show sub-menus.
By installing this menu on your blog, it will make your blog more interesting. For blog owner, you can categorized the contents easily. And for your blog's visitor, of course, they will explore your blog easier and easily choose the categories they like. You can see live demo here.
The navigation menu I’m going to explain is not using javascript. It is built using HTML and CSS. So, I believe you will find it very easy to install it on your blog.
Well, it’s time to let you know how to install this menu on your blog. As usual, you need to login to www.blogger.com and directly go to Edit HTML. Before precede to the next step, remember to back-up your template first.
  1. Find this code ]]></b:skin>
  2. Paste the code below right above the previous code. The code in red is the code for width of menu area. Mostly the width is the same with the body width of your template. Change the value to suit your template.
    #NavbarMenu { background: #000; width: 874px; height: 35px; font-size: 13px; font-family: Arial, Tahoma, Verdana; color: #fff; font-weight: bold; margin: 0px; padding: 0px; } #NavbarMenuleft { width: 874px; float: left; margin: 0; padding: 0; } #nav { margin: 0; padding: 0; } #nav ul { float: left; list-style: none; margin: 0; padding: 0; } #nav li { list-style: none; margin: 0; padding: 0; } #nav li a, #nav li a:link, #nav li a:visited { background: #808080; height: 24px; color: #fff; display: block; font-size: 14px; font-family: trebuchet ms, Times New Roman; font-weight: bold; text-transform: none; text-decoration: none; margin: 0; padding-top:6px; padding-bottom:5px; padding-left:13px; padding-right:13px; border-right: 1px solid #000; } #nav li a:hover, #nav li a:active {background: #c0c0c0; color: #000; margin: 0; padding-top:6px; padding-bottom:5px; padding-left:13px; padding-right:13px; text-decoration: none; } #nav li li a, #nav li li a:link, #nav li li a:visited { background: #c0c0c0; width: 150px; color: #000; font-size: 14px; font-family: trebuchet ms, Times New Roman; font-weight: normal; text-transform: none; float: none; margin: 0; padding: 7px 10px; border: 1px solid #000; } #nav li li a:hover, #nav li li a:active { background: #000; color: #fff; padding: 7px 10px; } #nav li { float: left; padding: 0; } #nav li ul { z-index: 9999; position: absolute; left: -999em; height: auto; width: 170px; margin: 0; padding: 0; } #nav li ul a { width: 140px; } #nav li ul ul { margin: -32px 0 0 171px; } #nav li:hover ul ul, #nav li:hover ul ul ul, #nav li.sfhover ul ul, #nav li.sfhover ul ul ul { left: -999em; } #nav li:hover ul, #nav li li:hover ul, #nav li li li:hover ul, #nav li.sfhover ul, #nav li li.sfhover ul, #nav li li li.sfhover ul { left: auto; } #nav li:hover, #nav li.sfhover { position: static; }
  3. Before precede to the next step, you need to determine the location of the menu on your blog. Mostly, the menu position is either on the top (above the header) or below the header block. In this sample I put the menu above the header then you have to look for this code <div id='header-wrapper'>
  4. Paste the code below above the previous code.
    <div id='NavbarMenu'>
    <div id='NavbarMenuleft'>
    <ul id='nav'>
    <li><a href='http://allfreetips4u.blogspot.com'>Home</a> </li>
    <li><a href='#'>Blogger Template</a>
    <ul>
            <li><a href='http://allfreetips4u.blogspot.com/search/label/2 column'>2 Column</a> </li>
            <li><a href='http://allfreetips4u.blogspot.com/search/label/3 column'>3 Column</a> </li>
            <li><a href='http://allfreetips4u.blogspot.com/search/label/4 column'>4 Column</a> </li> </ul> </li>
    <li><a href='#'>Blogging Trick</a> </li>
    <li><a href='#'>Forum</a>
    <ul>
           <li><a href='http://allfreetips4u.blogspot.com/search/label/Learn SEO'>Learn SEO</a> </li>
           <li><a href='http://allfreetips4u.blogspot.com/search/label/Adsense'>Adsense</a> </li>
           <li><a href='http://allfreetips4u.blogspot.com/search/label/Blog Monetize'>Blog Monetize</a> </li>
          <li><a href='http://allfreetips4u.blogspot.com/search/label/Link Exchange'>Link Exchange</a> </li>
    </ul> </li> </ul>
    </div> </div>
  5. Now, it’s time to change some codes to meet your needs. The blue code is url-link and the red code is the anchor-text or the title of menu or sub-menu related to the link. For example Home menu. If you click on the Home menu, you’ll go to main page, so change the url with your blog’s url. Another example for Blogger Template menu. If you click the menu, it will take you to a page or pages that show postings with ‘blogger template’ label. So, you can change the url like this http://blogname.blogspot.com/search/label/blogger template. Change blogname with your blog’s name.
  6. You can add or subtract the menu and submenu as you like. To add menu, just repeat the code as many time as you like. To subtract menu or sub-menu, you can remove the code.
  7. And that’s it. Don’t forget to save your work.
  8. Now your blog looks more interesting.

0 Galeri Imej Cantik Untuk Blogger

Halo semuanya…
Baru-baru ini saya jalan-jalan ke ‘rumah’ tetangga dan menemukan ‘sesuatu’ yang menurut saya sangat menarik dan bila dipasang di blog, pasti akan membuat blog tampak lebih oke. Si pencipta – Stu Nicholls – menyebut fitur ini dengan sebutan “A permanent image click gallery with up/down thumbnails”. Biar lebih jelas lihat deh demonya di sini atau buat yang ‘malas’ lihat screenshot di bawah ini:
image

Kamu bisa lihat di sebelah kanan, terdapat  jendela yang menampilkan gambar dalam ukuran ‘full’ apabila kamu klik ‘thumbnail’ di sebelah kanan. Sedangkan di bagian bawah disediakan baris untuk menempatkan teks dan link.
Dan fitur ini tidak menggunakan JavaScript, hanya CSS dan HTML.
Mau pasang ini di blog kamu? Nah pada kesempatan ini saya akan memberikan cara memasang fitur ini di blog kamu.
  1. Seperti biasa login ke www.blogger.com > Tata Letak > Edit HTML
  2. Jangan lupa untu mem-back up dulu template kamu
  3. Letakkan kode di bawah ini tepat di atas ]]></b:skin>
    /* ================================================================ This copyright notice must be untouched at all times. The original version of this stylesheet and the associated (x)html is available at http://www.cssplay.co.uk/menu/double-click-gallery-vertical.html Copyright (c) 2005-2009 Stu Nicholls. All rights reserved. This stylesheet and the associated (x)html may be modified in any way to fit your requirements. =================================================================== */ #gallery { width:750px; height:550px; margin:0 auto; position:relative; font-family:verdana, arial, sans-serif; background:#fff; } #gallery #slides {position:absolute; right:10px; top:0; height:550px; width:92px; overflow:hidden; text-align:center; z-index:500;} #gallery #slides div {width:92px; height:550px; position:relative; padding-top:10px;} #gallery #slides div ul {padding:0; margin:0; list-style:none; width:92px; height:550px} #gallery #slides div ul li {float:left; padding:1px 0; width:92px; height:69px;} #gallery #slides div ul li a {display:block; width:92px; height:69px; float:left;} #gallery #slides div ul li a b {display:none;} #gallery #slides div ul li a.previous {background:url(http://www.cssplay.co.uk/menu/double-click/up.png) no-repeat center center;} #gallery #slides div ul li a.next {background:url(http://www.cssplay.co.uk/menu/double-click/down.png) no-repeat center center;} #gallery #slides div ul li a img {display:block; width:92px; height:69px; border:0;} #gallery #slides div ul li img.blank {margin:0 auto; padding-top:11px;} #gallery #slides div ul li a:focus {outline:0;} #gallery #fullsize {position:absolute; left:0; top:0; height:550px; width:750px; overflow:hidden; text-align:center; z-index:200;} #gallery #fullsize div {width:750px; height:700px; padding-top:70px; position:relative;} #gallery #fullsize div img {clear:both; display:block; margin:0 auto; border:1px solid #eee; width:480px; height:360px; position:relative; background:#fff; padding:10px;} #gallery #fullsize div h3 {padding:10px 0 0 0; margin:0; font-size:18px;} #gallery #fullsize div p {padding:5px 135px; margin:0; font-size:12px; line-height:18px;}
  4. Dalam kasus ini, fitur akan diletakkan di bawah header, maka carilah kode berikut ini:
    <div id='header-wrapper'>
    <div id='head-inner'>
    <b:section class='header' id='header' maxwidgets='1' showaddelement='no'>
    <b:widget id='Header1' locked='true' title='Free Tips II (Header)' type='Header'/>
    </b:section> </div> <div id='r_head'> <b:section class='header' id='header2' preferred='yes'/>
    </div>
    </div>
  5. Lalu letakkan kode di bawah ini tepat di bawah kode header.
    <div id='gallery'>
        <div id='slides'>
            <div id='slide1'>
                <ul>
                    <li><img alt='' class='blank' src='http://www.cssplay.co.uk/menu/double-click/upx.png'/></li>
                    <li><a href='#pic1'><img alt='Winter branches' src='http://www.cssplay.co.uk/menu/double-click/pic1.jpg'/></a></li>
                    <li><a href='#pic2'><img alt='Wading birds' src='http://www.cssplay.co.uk/menu/double-click/pic2.jpg'/></a></li>
                    <li><a href='#pic3'><img alt='Bird on a post' src='http://www.cssplay.co.uk/menu/double-click/pic3.jpg'/></a></li>
                    <li><a href='#pic4'><img alt='Early bloomers' src='http://www.cssplay.co.uk/menu/double-click/pic4.jpg'/></a></li>
                    <li><a href='#pic5'><img alt='Green lizard' src='http://www.cssplay.co.uk/menu/double-click/pic5.jpg'/></a></li>
                    <li><a class='next' href='#slide2'><b>Next</b></a></li>
                </ul>
            </div>
            <div id='slide2'>
                <ul>
                    <li><a class='previous' href='#slide1'><b>Previous</b></a></li>
                    <li><a href='#pic2'><img alt='Wading birds' src='http://www.cssplay.co.uk/menu/double-click/pic2.jpg'/></a></li>
                    <li><a href='#pic3'><img alt='Bird on a post' src='http://www.cssplay.co.uk/menu/double-click/pic3.jpg'/></a></li>
                    <li><a href='#pic4'><img alt='Early bloomers' src='http://www.cssplay.co.uk/menu/double-click/pic4.jpg'/></a></li>
                    <li><a href='#pic5'><img alt='Green lizard' src='http://www.cssplay.co.uk/menu/double-click/pic5.jpg'/></a></li>
                    <li><a href='#pic6'><img alt='Feeding the birds' src='http://www.cssplay.co.uk/menu/double-click/pic6.jpg'/></a></li>
                    <li><a class='next' href='#slide3'><b>Next</b></a></li>
                </ul>
            </div>
            <div id='slide3'>
                <ul>
                    <li><a class='previous' href='#slide2'><b>Previous</b></a></li>
                    <li><a href='#pic3'><img alt='Bird on a post' src='http://www.cssplay.co.uk/menu/double-click/pic3.jpg'/></a></li>
                    <li><a href='#pic4'><img alt='Early bloomers' src='http://www.cssplay.co.uk/menu/double-click/pic4.jpg'/></a></li>
                    <li><a href='#pic5'><img alt='Green lizard' src='http://www.cssplay.co.uk/menu/double-click/pic5.jpg'/></a></li>
                    <li><a href='#pic6'><img alt='Feeding the birds' src='http://www.cssplay.co.uk/menu/double-click/pic6.jpg'/></a></li>
                    <li><a href='#pic7'><img alt='A group of butterflies' src='http://www.cssplay.co.uk/menu/double-click/pic7.jpg'/></a></li>
                    <li><a class='next' href='#slide4'><b>Next</b></a></li>
                </ul>
            </div>
            <div id='slide4'>
                <ul>
                    <li><a class='previous' href='#slide3'><b>Previous</b></a></li>
                    <li><a href='#pic4'><img alt='Early bloomers' src='http://www.cssplay.co.uk/menu/double-click/pic4.jpg'/></a></li>
                    <li><a href='#pic5'><img alt='Green lizard' src='http://www.cssplay.co.uk/menu/double-click/pic5.jpg'/></a></li>
                    <li><a href='#pic6'><img alt='Feeding the birds' src='http://www.cssplay.co.uk/menu/double-click/pic6.jpg'/></a></li>
                    <li><a href='#pic7'><img alt='A group of butterflies' src='http://www.cssplay.co.uk/menu/double-click/pic7.jpg'/></a></li>
                    <li><a href='#pic8'><img alt='Ladybirds' src='http://www.cssplay.co.uk/menu/double-click/pic8.jpg'/></a></li>
                    <li><a class='next' href='#slide5'><b>Next</b></a></li>
                </ul>
            </div>
            <div id='slide5'>
                <ul>
                    <li><a class='previous' href='#slide4'><b>Previous</b></a></li>
                    <li><a href='#pic5'><img alt='Green lizard' src='http://www.cssplay.co.uk/menu/double-click/pic5.jpg'/></a></li>
                    <li><a href='#pic6'><img alt='Feeding the birds' src='http://www.cssplay.co.uk/menu/double-click/pic6.jpg'/></a></li>
                    <li><a href='#pic7'><img alt='A group of butterflies' src='http://www.cssplay.co.uk/menu/double-click/pic7.jpg'/></a></li>
                    <li><a href='#pic8'><img alt='Ladybirds' src='http://www.cssplay.co.uk/menu/double-click/pic8.jpg'/></a></li>
                    <li><a href='#pic9'><img alt='Butterfly' src='http://www.cssplay.co.uk/menu/double-click/pic9.jpg'/></a></li>
                    <li><a class='next' href='#slide6'><b>Next</b></a></li>
                </ul>
            </div>
            <div id='slide6'>
                <ul>
                    <li><a class='previous' href='#slide5'><b>Previous</b></a></li>
                    <li><a href='#pic6'><img alt='Feeding the birds' src='http://www.cssplay.co.uk/menu/double-click/pic6.jpg'/></a></li>
                    <li><a href='#pic7'><img alt='A group of butterflies' src='http://www.cssplay.co.uk/menu/double-click/pic7.jpg'/></a></li>
                    <li><a href='#pic8'><img alt='Ladybirds' src='http://www.cssplay.co.uk/menu/double-click/pic8.jpg'/></a></li>
                    <li><a href='#pic9'><img alt='Butterfly' src='http://www.cssplay.co.uk/menu/double-click/pic9.jpg'/></a></li>
                    <li><a href='#pic10'><img alt='Trees in the mist' src='http://www.cssplay.co.uk/menu/double-click/pic10.jpg'/></a></li>
                    <li><img alt='' class='blank' src='http://www.cssplay.co.uk/menu/double-click/downx.png'/></li>
                </ul>
            </div>
        </div>
        <div id='fullsize'>
            <div id='pic1'>
                <img alt='Winter branches' src='http://www.cssplay.co.uk/menu/double-click/pic1.jpg'/>
                <h3>Winter branches</h3>
                <p>Followed by some descriptive text and maybe a <a href='http://www.cssplay.co.uk/'>link</a>.</p>
            </div>
            <div id='pic2'>
                <img alt='Wading birds' src='http://www.cssplay.co.uk/menu/double-click/pic2.jpg'/>
                <h3>Wading birds</h3>
                <p>Another piece of descriptive text and again a <a href='http://www.cssplay.co.uk/'>link</a>.</p>
            </div>
            <div id='pic3'>
                <img alt='Bird on a post' src='http://www.cssplay.co.uk/menu/double-click/pic3.jpg'/>
                <h3>Bird on a post</h3>
                <p>Yet more descriptive text and maybe a <a href='http://www.cssplay.co.uk/'>link</a>.</p>
            </div>
            <div id='pic4'>
                <img alt='Early bloomers' src='http://www.cssplay.co.uk/menu/double-click/pic4.jpg'/>
                <h3>Early bloomers</h3>
                <p>And another line of descriptive text and maybe a <a href='http://www.cssplay.co.uk/'>link</a>.</p>
            </div>
            <div id='pic5'>
                <img alt='Green lizard' src='http://www.cssplay.co.uk/menu/double-click/pic5.jpg'/>
                <h3>Green lizard</h3>
                <p>With descriptive text and maybe a <a href='http://www.cssplay.co.uk/'>link</a>.</p>
            </div>
            <div id='pic6'>
                <img alt='Feeding the birds' src='http://www.cssplay.co.uk/menu/double-click/pic6.jpg'/>
                <h3>Feeding the birds</h3>
                <p>A description of the picture can go here with a <a href='http://www.cssplay.co.uk/'>link</a>.</p>
            </div>
            <div id='pic7'>
                <img alt='A group of butterflies' src='http://www.cssplay.co.uk/menu/double-click/pic7.jpg'/>
                <h3>A group of butterflies</h3>
                <p>Descriptive text and maybe a <a href='http://www.cssplay.co.uk/'>link</a>.</p>
            </div>
            <div id='pic8'>
                <img alt='Ladybirds' src='http://www.cssplay.co.uk/menu/double-click/pic8.jpg'/>
                <h3>Ladybirds</h3>
                <p>The text can be over as many lines as you want, but you may need to adjust the size of the containing div to make sure that it can all be seen. The <a href='http://www.cssplay.co.uk/'>link</a> can be used if you want.</p>
            </div>
            <div id='pic9'>
                <img alt='Butterfly' src='http://www.cssplay.co.uk/menu/double-click/pic9.jpg'/>
                <h3>Butterfly</h3>
                <p>Followed by some descriptive text and maybe a <a href='http://www.cssplay.co.uk/'>link</a>.</p>
            </div>
            <div id='pic10'>
                <img alt='Trees in the mist' src='http://www.cssplay.co.uk/menu/double-click/pic10.jpg'/>
                <h3>Trees in the mist</h3>
                <p>Another piece of descriptive text and maybe a <a href='http://www.cssplay.co.uk/'>link</a>.</p>
            </div>
        </div>
    </div>
    <p class='info'>Copyright 2009 stu nicholls - CSS play</p>

    Keterangan:
    Warna ungu adalah url dari gambar - berurutan - dari gambar 1 sampai dengan gambar terakhir.
    Warna hijau adalah judul dari gambar
    Warna biru adalah keterangan gambar dan link
  6. Sehingga kodenya menjadi seperti ini:image
  7. Lalu simpan perubahan yang telah kamu lakukan.
  8. Lihat hasilnya di blog kamu.
Ingat, jangan merubah credit link dari si pembuat fitur ini! Sebagai bentuk penghormatan atas kerja kerasnya menciptakan suatu fitur yang indah seperti ini dan sebagai manusia yang beradab – sekali lagi – jangan merubah/menghilangkan credit link yang terdapat di dalam skrip. Si pembuat membolehkan kita semua menggunakan fitur ini, tetapi khusus untuk penggunaan komersial kamu harus meminta ijin tertulis dari si pembuat. Kamu bisa lihat detilnya di situs si pembuat dengan mengklik link ini.
Saat ini saya sedang membuat template baru dengan memasukkan fitur ini di dalamnya. Tunggu ya kehadirannya!

0 Cara Setting Blog

Cara Setting Blog Bagi para sobat yang baru membuat blog, ada beberapa settingan / pengaturan yang harus di lakukan agar blog kita bisa di kenali mesin pencari semisal Google,yahoo, Msn serta teman-temannya yang lain. Bila belum tahu apa yang harus di setting, silahkan ikuti langkah-langkahnya :
  1. Silahkan sobat Login ke blogger.com dengan user name dan password milik sobat
  2. Klik judul blog yang mau di setting ( jika sobat sudah mempunyai beberapa blog)
  3. Klik Pengaturan, trus klik Dasar. Beberapa form yang harus di isi pada menu Dasar : • Judul ⇒ isi dengan judul blog sobat. Contoh : Blogspot Tutorial • Uraian ⇒ isi dengan deskripsi blog sobat. Contoh : disini kita akan berbagi pengalaman dan pengetahuan seputar Blog • Tambahkan blog Anda ke daftar kami? ⇒ pilih ya agar setiap posting kita selalu masuk di daftar Blogger.com. • Biarkan mesin pencari menemukan blog Anda? ⇒ pilih ya • Tampilkan Editing Cepat di Blog Anda? ⇒ pilih Ya • Tampilkan Link Posting Email? ⇒ Sebaiknya pilih ya, tapi pilih tidak juga tidak apa-apa • Konten Dewasa? ⇒ Pilih tidak. Kalau pilih ya berarti blog anda di anggap blog untuk dewasa (semacam blog porno) • Tampilkan Mode Compose untuk semua blog Anda? ⇒ pilih Ya • Aktifkan transliterasi? ⇒ pilih Tidak, jika anda ingin ada button untuk mengubah biasa ke hurup hindi (India), pilih ya jika sebaliknya) • Klik tombol Simpan Pengaturan . Selesai
  4. Klik Publikasi untuk mengatur menu Publikasi : • Alamat Blog*Spot ⇒ isi dengan nama blog sobat. Contoh : kolom-tutorial. Biasanya alamat yang tercantum adalah langsung alamat blog anda, jadi jangan di ubah aja. • Klik tombolSimpan pengaturan. Selesai
  5. Klik Format untuk mengatur menu format : • Tampilkan ⇒ pilih angka posting yang ingin anda tampilkan. Missal : Tampilkan : 6 posting, berarti posting yang akan tampil di halaman blog sobat adalah sebanyak enam posting. Pilih posting (jangan hari) pada menu pulldown. • Format Header Tanggal ⇒ pilih model tanggal/bulan yang anda sukai, Format tanggal/bulan ini akan selalu muncul diatas postingan kita. • Format tanggal Index Arsip ⇒ pilih model untuk peng-arsip-an yang anda sukai. • Format Timestamp ⇒ Pilih bentuk waktu yang anda sukai. • Zona Waktu ⇒ Pilih zona waktu yang sesuai. Contoh untuk WIB : [UTC-+7.00]Asia/Jakarta. • Bahasa ⇒ Pilih bahasa yang di inginkan. • Tampilkan Field judul ⇒ Pilih ya atau tidakpun tidak apa-apa • Tampilkan kolom link ⇒ pilih ya, tapi seandainya pilih tidak juga tidak apa-apa. • Aktifkan perataan float ⇒ pilih ya, tapi seandainya mau pilih tidak juga tidak apa-apa • Klik tombol Simpan Pengaturan. Selesai
  6. Klik Komentar Untuk mengatur menu komentar : • Komentar ⇒ pilih tampilkan, ini agar artikel anda dapat di komentari oleh pengunjung • Siapa yang Bisa Berkomentar ? ⇒ Pilih Siapa pun - termasuk Pengguna Anonim. Ini di maksudkan agar setiap orang bisa berkomentar tidak terbatas kepada anggota blogspot saja. • Default Komentar untuk Posting ⇒ pilih Posting baru memiliki komentar. • Link balik ⇒ Pilih tampilkan. Ini dimaksudkan agar kita mengetahui apabila ada yang memasang link pada artikel kita. • Default Link Balik untuk Posting ⇒ pilih Posting baru Memiliki Link Balik. • Format Timestamp Komentar ⇒ pilih format jam yg singkat. Contoh: 8.00 PM. • Tampilkan komentar dalam sebuah window popup? ⇒ pilih Ya. Supaya ketika di klik oleh pengunjung, halaman blog anda tidak menghilang/tertimpa halaman komntar. • Aktifkan moderasi komentar? ⇒ pilih Tidak (sebaiknya). • Tampilkan verifikasi kata untuk komentar? ⇒ pilih Ya. ini di maksudkan agar terhindar dari software robot dengan tujuan melakukan spam. • Tampilkan gambar profil dalam komentar? ⇒ pilih ya. Supaya gambar komentator yg punya id blogger, dapat menampilkan fotonya. • Email Pemberitahuan Komentar ⇒ isi dg alamat email anda, ini di maksudkan agar setiap ada yang berkomentar pada artikel anda, anda dapat kiriman email dari blogger.com sebagai pemberitahuan. • Klik tombol Simpan Pengaturan. Selesai
  7. Klik Arsipkan Untuk mengatur menu Arsipkan : • Frekuensi Arsip ⇒ pilih Bulanan. • Aktifkan Halaman Posting? ⇒ pilih ya. • Klik tombol Simpan Pengaturan . Selesai.
  8. Klik Fedd Situs untuk mengatur menu feed situs : • Izinkan Feed Blog ⇒ pilih Penuh. • Posting URL Pengubahan Arah Feed ⇒ di isi dengan alamat feed pengganti semisal alamat feed dari feed burner, jika belum punya, di kosongkan saja. • Footer Feed Posting ⇒ Silahkan di isi dengan kode iklan yang anda punya, misal kode iklan dari Google adsense dsb, namun jika tidak punya, silahkan kosongkan saja. • Klik tombol Simpan Perubahan. Selesai.

Agar kita bisa menikmati layanan RSS Feed, kita harus berlangganan. Maka langkah pertama adalah mendaftar, caranya adalah:
  1. Masuk ke www.feedburner.com, pada halaman muka terlihat seperti di bawah ini. Masukkan e-mail dan password yang anda gunakan pada blogspot atau google account anda. Bila belum memiliki google account, klik Create an Account.
  2. Pada kotak yang tersedia, anda ketikkan alamat blog yang anda miliki. Jika ingin menggunakan podcast, klik I am podcaster, jika tidak opsi tersebut tidak perlu dipilih. Lalu klik Next.
  3. Setelah itu akan tampil halaman Identify feed Source. Ada 2 pilihan feed yang bisa anda gunakan, yaitu RSS dan Atom, Anda bisa memilih salah satunya. Lalu klik Next.
  4. Pada halaman berikutnya adalah Feed Address anda. Anda bisa merubah feed address sesuai keinginan anda. Jika sudah, klik Next.
  5. Selanjutnya akan tampil halaman konfirmasi, yang menyatakan bahwa feedburner sudah dibuat.
  6. Di bagian bawah, klik pada link Skip directly to feed management.
  7. Setelah itu, anda akan masuk pada halaman Dashboard dari FeedBurner. Klik pada Edit Feed Details.
  8. Akan tampil feed address yang anda miliki. Anda copy pada bagian Feed Address. Catatan: anda bisa merubah feed address di sini. Jangan lupa menyimpan perubahan dengan meng-klik Save Feed Details.
  9. Sekarang anda masuk ke halaman Dashboard di blogger.com.
  10. Klik Settings (Pengaturan).
  11. Klik pada link Feed Site (Feed situs>.
  12. Masukkan Feed Address, yang telah anda copy dari feedburner, pada kotak Post FeedRedirect URL.
  13. Lalu klik Save Settings.
  14. Sampai di sini anda sudah terhubung pada layanan feed yang disediakan oleh FeedBurner

0 MEMASANG HITS COUNTER (Part 2)


Memasang Hits Counter dari EasyTrafficCounter.Com
Apa anda masih ingat artikel saya tentang membuat widget feedcounter, sebuah layanan dari feedburner berupa hits counter. Dengan memasang hits counter pada blog anda dapat mengetahui sudah berapa banyak pengunjung yang 'datang' ke blog anda. Selain dari feedburner, ada banyak website yang menyediakan hits counter secara gratis, salah satunya dari EasyTrafficCounter.Com. Caranya sangat mudah:
  1. Masuk ke www.easytrafficcounter.com.
  2. Pilih salah satu model hits counter yang tersedia.
  3. Di bagian bawah anda akan temukan kode HTML. Copy kode tersebut.
  4. Setelah mengcopy kode tadi, anda tinggal memasangnya di blog anda.
  5. Masuk ke blogger.com. Login dengan user id anda.
  6. Masuk ke halaman Dashboard. Klik Layout (Tata Letak).
  7. Klik menu Add Gadget (Tambah Gadget).
  8. Klik HTML/JavaScript.
  9. Paste (Ctrl + V) kode HTML dari hits counter tadi pada bagian Content (Konten).
  10. Klik Save (Simpan).
  11. Hasilnya seperti gambar di bawah ini:

0 Top 10 Hits Counter Widgets (Part 1)

Bahasa | English
NEOCOUNTER1 Widgets are simple, fun, and useful applications that can be embedded on a webpage, blog, or social media page. Widget is easy to be installed and most of the widgets is customizeable.
Hits counter widget is a widget which provides traffic information about your blog visitors. On the internet you will find a lot of hits counter with various forms and features, some are very simple form, and the others are very interesting with an advance feature. Very interesting isn’t it? That’s why Free Tips 4U has selected 10 best hits counter widgets for you to pick.
NEOCOUNTER_01 This widget has several features that makes this widget different to other widgets. This widget gives you lot of options for skin, there are more than 15 skins. Or if you are confused what type of skin you like, just pick the random skin option, which it will change skin automatically. Also it displays the flag that represents the country of the visitors are coming from. Cool!
If you like this widget, get it here!
……………………………………………………………………………………….
neopod_mont If you see the appearance of this widget, you’ll remember an i-Pod from Apple, I think, that’s why the maker called the widget: NeoPod.
The main screen displays 7 icons, each representing information or different function. Therefore, this widget is a combination of several widgets. In addition to hits counter function, there are also a chat box, feeds from all over the world, and displays statistic diagram.
Get it here!
……………………………………………………………………………………………………...
trafficestimate_mont Unlike the other widgets shown here, this widget has a very simple appearance from the others. This widget does not display statistics visitors. But the advantages of this widget is that it can show how much traffic do those websites get? Use the Traffic Estimate tool to find out approximately how much traffic a website gets by entering the URL of the web site below. After you enter the address, click the Estimate button, then only in a few seconds it will display the number of visitors during the period of 30 days ago.
Maybe you like something simple like this widget, for example, then you can get the widget here.
……………………………………………………………………………………………………...
geocounter2 This widget has a simple look too with soft color. Has a feature to show visitors from various countries along with the flag of each country. In addition, this widget also displays the number of visits today and total visits, and the number that are online. And every time someone from a new country visits your site, a new flag will be added to your counter.
Get it here.
…………………………………………………………………………………………
NEOCOUNTER1 Another widget that looks so cool. With the shape like a ball with a variety of skin choices provided, this gives an added value to this widget.
Get this widget here!

Continue…

0 MEMASANG HITS COUNTER (part3)


Memasang Hits Counter Dari RightStat.Com
Kali ini saya akan menjelaskan cara mendaftar dan memasang hits counter dari rightstat.com.
  1. Masuk ke www.rightstat.com.


  2. Klik sign up

  3. Silakan anda pilih model hits counter yang anda suka.

  4. Pada kolom Counter Start Value anda bisa mengatur nomor start awal.


  5. Pada kotak Site Url, masukkan alamat blog atau website anda.


  6. Setelah selesai mengisi, klik Submit.


  7. Jika berhasil anda akan mendapatkan kode hits counter. Copy kode tersebut.

  8. Sekarang anda masuk ke halaman Dashboard blogger.com, dan login menggunakan user id anda
  9. Klik Layout (Tata Letak)
  10. Klik Add Gadget (Tambah Gadget)
  11. Pilih HTML/JavaScript. Pada halaman Konfigurasi HTML/JavaScript, paste (Ctrl + V) kode HTML dari rightstats.com di bagian Content (Konten). Lalu klik Save.
  12. Lihat hasilnya di blog anda

0 Recent Posts Widget With Thumbnails and Summaries

Widget Recent Post yang Menampilkan Thumbnail dan Ringkasan Posting
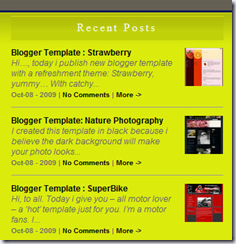
image Recent Posts and Recent Comments widgets are important widgets to be installed on your blog. They can help your blog’s visitor to know what is your latest posts or articles, and also the comments.
Do you still remember how to add Recent Posts widget using feed address like this: ‘http://blogname.blogspot.com/feeds/posts/default’ ? Now, there is an easier method than the old method. By using this new method you can set unlimited number of posts will be displayed on your blog. And also, you can display thumbnail of your recent posts.  Interested? Okay, let me show you how to add this widget – including Recent Comments widget – to be installed on your blog.

  1. Login to www.blogger.com and go to your Dashboard > Layout
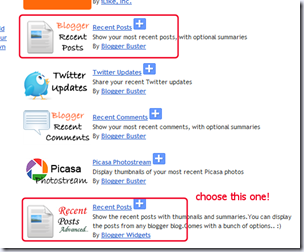
  2. Click on Add a Gadget, a pop-up window will appear on your screen. Scroll down till you see on the left side “Featured” link. Click the link and it will bring you to Featured window. image
  3. There are two Recent Posts Widgets on the list. Choose the second one called Recent Posts Advanced. This widget can show recent posts with thumbnails and summaries. And using this widget, you can display recent posts from any blogger blog.
    image
  4. On Configure Gadget window you’ll see lots of options. image
    • Title :  name of your widget/gadget
    • Height : determine the height of the widget
    • Blog Url :  url of blog you want to display the recent posts
    • Display post thumbnails : display the thumbnail or not
    • Display post summaries : display summaries or not
    • Summary length   : number of character of summary to be displayed
    • Display post date : display date or not
    • Display the number of comments : display number of comment or not
    • Display the Read more link : display read more or not
    • Display a Separator b/w posts : if you choose to display, then there will be line across the width of widget between posts
  5. You have finished configure the widget. Don’t forget to Save your work.
  6. Now see the result on your blog. It will look like the image below or you can see the demo here.
 image
--------------------------------------------------------------------------------Bahasa Indonesia-----------
Recent Post dan Recent Comments adalah widget penting yang dapat menampilkan posting/artikel terakhir maupun komentar terakhir. Biasanya diperlihatkan dalam bentuk daftar secara vertikal.
Masih ingat dengan pembahasan yang lalu mengenai Recent Posts dengan menggunakan alamat feed dengan alamat seperti ini : ‘http://nama bloganda.blogspot.com/feeds/posts/default’ ? Ada beberapa kekurangan dari cara tersebut, yaitu jumlahnya yang dibatasi hanya 5 posting terakhir dan tidak bisa menampilkan thumbnail. Tapi sekarang ada widget yang lebih mudah pemasangan dan mempunyai fitur yang berlimpah, yaitu bisa menampilkan posting tak terbatas, bisa menampilkan thumbnail, bisa menampilkan ringkasan posting dengan jumlah karakter yang bisa ditentukan oleh anda, dan masih banyak lagi. Tertarik? Oke, saya akan jelaskan caranya buat anda.
  1. Login ke www.blogger.com dan pada halaman Dasbor pilih Tata Letak.
  2. Lalu klik Tambah Gadget, sebuah jendela Tambahkan Gadget akan muncul. Pilih ‘Unggulan’ pada sisi kiri.
  3. Pada jendela Unggulan, anda akan menemukan 2 buah gadget Recent Posts. Pilihlah yang kedua dengan nama Recent Posts Advanced. Kenapa memilih yang ini, karena fiturnya lebih lengkap, yaitu seperti yang saya sudah sebutkan di atas.
  4. Setelah anda memilih Recent Posts Advanced, maka akan muncul halaman Setel Gadget. Anda akan melihat banyak sekali option yang tersedia, sebagai berikut:
    • Judul : nama atau judul dari gadget/widget
    • Ketinggian : ukuran tinggi dari gadget/widget ini
    • Blog Url : alamat blog mana pun untuk ditampilkan Recent Posts-nya
    • Number of Posts to display : jumlah posting/artikel yang ingin ditampilkan
    • Display posts thumbnail : bila ingin menampilkan thumbnail, cek lis. Bila tidak, kosongkan
    • Display posts summaries : bila ingin menampilkan ringkasan dari posting/artikel, cek lis. Sebaliknya kosongkan.
    • Summary length : panjang ringkasan dalam jumlah karakter
    • Display post date : bila ingin menampilkan tanggal posting, cek lis. Sebaliknya kosongkan.
    • Display the number of comments : bila ingin menampilkan jumlah komentar pada setiap posting, cek lis. Sebaliknya kosongkan.
    • Display the Read more link : bila ingin menampilkan Read more, cek lis. Sebaliknya kosongkan.
    • Display a Separator b/w the posts : bila ingin menampilkan garis pemisah antara posting satu dengan yang lainnya, cek lis. Bila tidak, kosongkan.
  5. Nah, sekarang anda sudah selesai dan bisa menyimpan dengan meng-klik Simpan.
  6. Silakan lihat hasilnya di blog kamu. Atau anda bisa melihat hasilnya pada gambar di atas ataupun lihat pada demonya di sini.

0 MEMBUAT RECENT COMMENTS


Recent Comments menampilkan komentar terakhir pada blog anda. Perbedaan dengan Recent Post terletak pada feed url, yaitu http://namablog.blogspot.com/feeds/comments/default. Berikut langkah-langkah selengkapnya:

  1. Masuk ke halaman Dashboard.

  2. Klik Layout. Pada Page Element (Elemen Halaman) pilih Add a gadget (Tambah gadget).

  3. Pilih Feed.

  4. Akan tampil kotak dialog Configure Feed (Konfigurasi feed). Masukkan alamat feed untuk postingan yaitu http://namablog.blogspot.com/feeds/comments/default. Ganti namablog dengan nama blog yang anda miliki.
  5. Klik Continue. Lalu akan tampil jendela seperti di bawah ini.

    • Anda bisa merubah Title (judul) sesuka hati anda misal postingan terakhir.

    • Show (Tampilkan), jumlah postingan terakhir yang ingin ditampilkan (maksimal 5).

    • Item dates (Tanggal item), untuk menampilkan tanggal postingan.

    • Item sources/authors (Sumber/penulis item), menampilkan sumber dan nama admin.

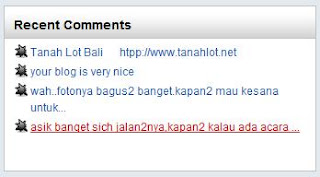
Tampilan Recent Comments pada blog anda.

0 Counter Strike : Extreme (PC Games)


Kelebihan
  • Terdapat 19 Karater yg berbeda-beda
  • Terdapat 20 Rifles (Primary Waepon) yg unik
  • Terdapat Dual Kriss di Machine Gun (Primary Weapon)

Spesifikasi Komputer
  • Operating System: Windows XP/7
  • Processor: P4 2.4Ghz or Better
  • RAM: 1GB
  • HARDRIVE 2GB
  • Graphic Card: Gforce FX series or better

Screenshots


===========================================================
Klik Gambar dibawah untuk Download

Password : alisoftware

Related Posts Plugin for WordPress, Blogger...